If you're a web developer with your own side projects, one of the tricky hurdles that you will come across sooner or later is how to actually get your project online and into production. Server administration is scary and a skill of its own and platforms like Heroku are great but get expensive quickly.
What if there was a middle ground? Luckily there is, with an awesome project called Dokku! It's basically a Heroku to host yourself. Pair that up with DigitalOcean and you can host a ton of projects for just $5 per month. (Use my referral link to sign up to receive $10 credit for free)
In this article I'll walk you through everything you need to know to get your apps and sites online.
Overview
- Create a DigitalOcean Droplet with Dokku installed
- Set up a Domain for Dokku
- Complete the Dokku Installation
- Deploy a Static Site with Dokku
- Deploy a Simple Node App to Dokku
- Deploy a Simple PHP App to Dokku
- Deploy a Node / MongoDB App to Dokku
- Add SSL (HTTPS) to Your Dokku Apps and Sites
It is a little bit of work to get Dokku configured initially but once you get through that, you can be creating and deploying an app within the same minute. It's worth it, so keep reading!
1. Creating a DigitalOcean Droplet with Dokku installed
First thing we need, is an actual VM (virtual machine) to host Dokku for us. Luckily we don't even need to bother with installing Dokku because DigitalOcean offers so-called one-click apps.
After you've logged into DigitalOcean, click the green button at the top right to create a new droplet.
Now follow along with the video below to configure your DigitalOcean droplet to have Dokku installed.
If you can't see the video, here is what happens:
- Click the "One-click apps" apps tab and select Dokku
- The cheapest $5 droplet will be enough for the start
- Choose a datacenter that is close to your and/or your target audience. I live in Germany, so I selected Frankfurt.
- Select the SSH key you want to use to authenticate with your droplet. If you haven't added one yet, checkout the official DigitalOcean Documentation on How to Add SSH Keys to Droplets
- Change the hostname of your droplet to something you will recognize. This
could be the main domain of that droplet or another identifier. I chose
dokku-tutorial. - Click "Create" and wait for your droplet to be created and provisioned. This can take several minutes.
2. Setting up a Domain for Dokku
By default, Dokku is setup to be accessed via an IP address. Let's say you created and deployed two apps – MeTube and Twotter. (Wow, such original examples!)
MeTube and Twotter would both have two different ports assigned by Dokku so you can access them via the same IP. So maybe 159.89.21.76:3000 for MeTube and 159.89.21.76:4000 for Twotter.
That kind of sucks though because nobody (including yourself) will remember the IP of your droplet. Instead, we want to use one or more domains. That's how I setup this page by the way!
maxschmitt.me is one app on my Dokku droplet, while pozzle.maxschmitt.me is another one.
Let's get you a domain connected to your Dokku instance. For this tutorial, I have registered paulgilbertisawesome.com.
Before you proceed with the steps below: Make sure you have purchased a domain and have it pointing to DigitalOcean's nameservers
Note
As far as I know, DigitalOcean does not sell domains, so you will need to buy them from somewhere else. To enable DigitalOcean to manage your domain's DNS configuration, you need to point that domain to DigitalOcean's nameservers.
How to do this varies from domain shop to domain shop but they will for sure
help you out or you can find something from a few simple Google queries like DigitalOcean nameservers or <Name of domain shop> nameservers.
- Go to the Networking section on DigitalOcean.
- Enter your domain (
paulgilbertisawesome.comin my case) and click "Add Domain" - Add an A Record with
@as the hostname and select the droplet we just created to redirect to:dokku-tutorial - Add a CNAME with
*as the hostname and set it up as an alias of your domain (paulgilbertisawesome.comin my case). This enables Dokku to host apps as a subdomain of your hostname. So something like my-app.paulgilbertisawesome.com
It might take a bit for your DNS change to propagate. The changes will usually be visible to you somewhere between 10 minutes and 1 hour. Depending on where you are in the world, this could also take up to 24 hours, so be patient.
To check if it works for you, run:
Terminal
$ host -a paulgilbertisawesome.comTrying "paulgilbertisawesome.com";; ->>HEADER<<- opcode: QUERY, status: NOERROR, id: 35949;; flags: qr rd ra; QUERY: 1, ANSWER: 5, AUTHORITY: 0, ADDITIONAL: 0;; QUESTION SECTION:;paulgilbertisawesome.com. IN ANY;; ANSWER SECTION:paulgilbertisawesome.com. 1530 IN NS ns1.digitalocean.com.paulgilbertisawesome.com. 3330 IN A 159.89.21.76paulgilbertisawesome.com. 1530 IN NS ns3.digitalocean.com.paulgilbertisawesome.com. 1530 IN NS ns2.digitalocean.com.paulgilbertisawesome.com. 1530 IN SOA ns1.digitalocean.com. hostmaster.paulgilbertisawesome.com. 1534711797 10800 3600 604800 1800Received 172 bytes from 192.168.178.1#53 in 2 ms
If you see the A record popping up and pointing to your droplet, the DNS change is now visible to you. That means we can keep going!
3. Completing the Dokku Installation
If you've made it this far, you already did the most complicated things. It gets easier from here on out with every step. We will now complete your Dokku installation and make a few more minor tweaks.
3.1. Configuring your Domain with Dokku
- Visit the IP or domain of your droplet in the browser. In my case: 159.89.21.76 or paulgilbertisawesome.com
- You will see your SSH key was already added
- Enter your domain as the Hostname
- Hit the checkbox to use virtualhost naming for apps. This allows dokku to make your apps available as subdomains instead of as port numbers of your droplet IP.
3.2. Updating Dokku to its Latest Version
It's super convenient that DigitalOcean sets Dokku up for us, but it's not always running the latest version. It's no problem though, we can update Dokku by running just two commands (after SSH-ing in ;)):
$ ssh root@159.89.21.76root@dokku-tutorial:~# sudo apt-get updateroot@dokku-tutorial:~# sudo apt-get install -qq -y dokku herokuish sshcommand plugn
This can take a few minutes.
3.3. Making it Convenient to Interact with Dokku
Currently, you would need to SSH into your droplet as root and then run dokku
to interact with Dokku:
Terminal
$ ssh root@159.89.21.76root@dokku-tutorial:~# dokkuUsage: dokku [--quiet|--trace|--rm-container|--rm|--force] COMMAND <app> [command-specific-options]Primary help options, type "dokku COMMAND:help" for more details, or dokku help --all to see all commands.Commands:apps Manage Dokku appscerts Manage Dokku apps SSL (TLS) certschecks Manage zero-downtime settingsconfig Pretty-print an app or global environmentdocker-options Pass options to Docker the various stages of an appdomains Manage vhost domains used by the Dokku proxyenter Connect to a specific app containerevents Show the last events (-t follows)help Print the list of commandslogs Show the last logs for an applicationls Pretty listing of deployed applications and containersnginx Interact with Dokku's Nginx proxyproxy Manage the proxy used by dokku on a per appps List processes running in app container(s)run Run a command in the environment of an applicationshell Spawn dokku shellssh-keys Manage public ssh keys that are allowed to connect to Dokkustorage Mount local volume / directories inside containerstags List all app image tagstar Deploy applications via tarball instead of gittrace Enable dokku tracingurl Show the first URL for an application (compatibility)urls Show all URLs for an applicationversion Print dokku's version
Alternatively, you can run ssh dokku@159.89.21.76 <dokku-command>. This is a
bit better, but who can remember that IP address?
What we're going for is that we can run ssh dokku <dokku-command>. To get this
working, you can add a little entry to your SSH config:
$HOME/.ssh/config
host dokku-tutorialHostName 159.89.21.76User dokku
(I already have a host called dokku, so I'm using dokku-tutorial instead.)
Try it out:
Terminal
$ ssh dokku-tutorialUsage: dokku [--quiet|--trace|--rm-container|--rm|--force] COMMAND <app> [command-specific-options]Primary help options, type "dokku COMMAND:help" for more details, or dokku help --all to see all commands.Commands:apps Manage Dokku appscerts Manage Dokku apps SSL (TLS) certschecks Manage zero-downtime settingsconfig Pretty-print an app or global environmentdocker-options Pass options to Docker the various stages of an appdomains Manage vhost domains used by the Dokku proxyenter Connect to a specific app containerevents Show the last events (-t follows)help Print the list of commandslogs Show the last logs for an applicationls Pretty listing of deployed applications and containersnginx Interact with Dokku's Nginx proxyproxy Manage the proxy used by dokku on a per appps List processes running in app container(s)run Run a command in the environment of an applicationshell Spawn dokku shellssh-keys Manage public ssh keys that are allowed to connect to Dokkustorage Mount local volume / directories inside containerstags List all app image tagstar Deploy applications via tarball instead of gittrace Enable dokku tracingurl Show the first URL for an application (compatibility)urls Show all URLs for an applicationversion Print dokku's versionConnection to 159.89.21.76 closed.
Awesome! With that, all our prep-work is done and we can move on to creating and deploying our first site to Dokku!
4. Deploying a Static Site with Dokku
For this tutorial I chose to register the domain paulgilbertisawesome.com which we will use to build sites and apps to honor the amazing guitarist that is Paul Gilbert.
Terminal
$ mkdir paulgilbertisawesome.com$ cd paulgilbertisawesome.com
We'll create a simple HTML page that embeds a cool video where Paul Gilbert shows off his Airplane Flanger:
src/index.html
<!DOCTYPE html><html><head><meta charset="utf-8" /><meta http-equiv="X-UA-Compatible" content="IE=edge" /><title>Paul Gilbert is AWESOME</title><meta name="viewport" content="width=device-width, initial-scale=1" /></head><body><iframewidth="560"height="315"src="https://www.youtube.com/embed/bkUfPUKilWI"frameborder="0"allow="autoplay; encrypted-media"allowfullscreen></iframe></body></html>
Most static sites these days need some sort of build step to compile JavaScript or CSS. We don't really need that because Paul Gilbert doesn't need a fancy page to be amazing, but we'll simulate this step anyways:
package.json
{"scripts": {"build": "rm -rf dist; mkdir dist; cp src/index.html dist/"}}
So our build script simply copies our HTML file over to a dist directory. This
dist directory is what we want to deploy to Dokku.
Let's get that working!
Dokku deployments happen via git. Let's get that setup:
Terminal
$ git initInitialized empty Git repository in /Users/max/code/tutorials/paulgilbertisawesome.com/.git/$ git add .$ git commit -m "initial commit"[master (root-commit) b7bfaca] initial commit3 files changed, 49 insertions(+)create mode 100644 dist/index.htmlcreate mode 100644 package.jsoncreate mode 100644 src/index.html$ git remote add dokku dokku-tutorial:paulgilbertisawesome.com
To explain that last line:
Note
We're adding a git remote called dokku (another common remote would be origin)
The address of the remote is dokku-tutorial:paulgilbertisawesome.com.
dokku-tutorial is substituted to dokku@159.89.21.76 thanks to our little
entry in ~/.ssh/config and paulgilbertisawesome.com is the name of the
Dokku app that should be created and deployed to.
Ok, we initialized a new git repository, created a commit and added our Dokku droplet as a remote. Now we need some way of telling Dokku that this repository is a static site.
What we need to do, is tell Dokku which buildpack to use. We will choose the
official NGINX buildpack by Dokku, which (as per the README of dokku/buildpack-nginx) also needs us to create an empty
file called .static:
Terminal
$ touch .static$ echo BUILDPACK_URL=https://github.com/dokku/buildpack-nginx > .env$ git add .$ git commit -m "add .static and .env with BUILDPACK_URL"
Note
Usually Dokku would detect a static site by the .static file alone. However, since our repository contains a
package.json, Dokku would think that it's a node app, so it would try to run npm start (which would fail) and
abort the deployment. That's why we need to explicitly set the BUILDPACK_URL.
Now, let's push our code to Dokku to get this thing deployed:
Terminal
$ git push dokku masterCounting objects: 11, done.Delta compression using up to 8 threads.Compressing objects: 100% (9/9), done.Writing objects: 100% (11/11), 1.21 KiB | 1.21 MiB/s, done.Total 11 (delta 2), reused 0 (delta 0)-----> Cleaning up...-----> Building paulgilbertisawesome.com from herokuish...-----> Adding BUILD_ENV to build environment...-----> Fetching custom buildpack-----> .static app detected-----> Copy static files to www-----> Download and unzip nginx-----> Download and unzip pcre-----> Download and unzip zlib-----> Download and unzip sigil-----> Compiling static nginx binaryar: `u' modifier ignored since `D' is the default (see `U')objs/src/core/nginx.o: In function `ngx_load_module':/cache/nginx-1.10.1/src/core/nginx.c:1475: warning: Using 'dlopen' in statically linked applications requires at runtime the shared libraries from the glibc version used for linkingobjs/src/os/unix/ngx_process_cycle.o: In function `ngx_worker_process_init':/cache/nginx-1.10.1/src/os/unix/ngx_process_cycle.c:838: warning: Using 'initgroups' in statically linked applications requires at runtime the shared libraries from the glibc version used for linkingobjs/src/core/nginx.o: In function `ngx_core_module_init_conf':/cache/nginx-1.10.1/src/core/nginx.c:1070: warning: Using 'getgrnam' in statically linked applications requires at runtime the shared libraries from the glibc version used for linking/cache/nginx-1.10.1/src/core/nginx.c:1059: warning: Using 'getpwnam' in statically linked applications requires at runtime the shared libraries from the glibc version used for linkingobjs/src/core/ngx_inet.o: In function `ngx_inet_resolve_host':/cache/nginx-1.10.1/src/core/ngx_inet.c:1120: warning: Using 'gethostbyname' in statically linked applications requires at runtime the shared libraries from the glibc version used for linking-----> Using default app-nginx.conf.sigil-----> Using default mime.types-----> Discovering process typesDefault types for -> web-----> Releasing paulgilbertisawesome.com (dokku/paulgilbertisawesome.com:latest)...-----> Deploying paulgilbertisawesome.com (dokku/paulgilbertisawesome.com:latest)...-----> Attempting to run scripts.dokku.predeploy from app.json (if defined)-----> App Procfile file found (/home/dokku/paulgilbertisawesome.com/DOKKU_PROCFILE)-----> DOKKU_SCALE file found (/home/dokku/paulgilbertisawesome.com/DOKKU_SCALE)=====> web=1-----> Attempting pre-flight checksFor more efficient zero downtime deployments, create a file CHECKS.See http://dokku.viewdocs.io/dokku/deployment/zero-downtime-deploys/ for examplesCHECKS file not found in container: Running simple container check...-----> Waiting for 10 seconds ...-----> Default container check successful!-----> Running post-deploy-----> Creating new /home/dokku/paulgilbertisawesome.com/VHOST...-----> Setting config varsDOKKU_PROXY_PORT: 80-----> Setting config varsDOKKU_PROXY_PORT_MAP: http:80:5000-----> Configuring paulgilbertisawesome.com...(using built-in template)-----> Creating http nginx.conf-----> Running nginx-pre-reloadReloading nginx-----> Setting config varsDOKKU_APP_RESTORE: 1=====> Renaming container (fc63646eb581) dreamy_pare to paulgilbertisawesome.com.web.1-----> Attempting to run scripts.dokku.postdeploy from app.json (if defined)=====> Application deployed:http://paulgilbertisawesome.comTo dokku-tutorial:paulgilbertisawesome.com* [new branch] master -> master
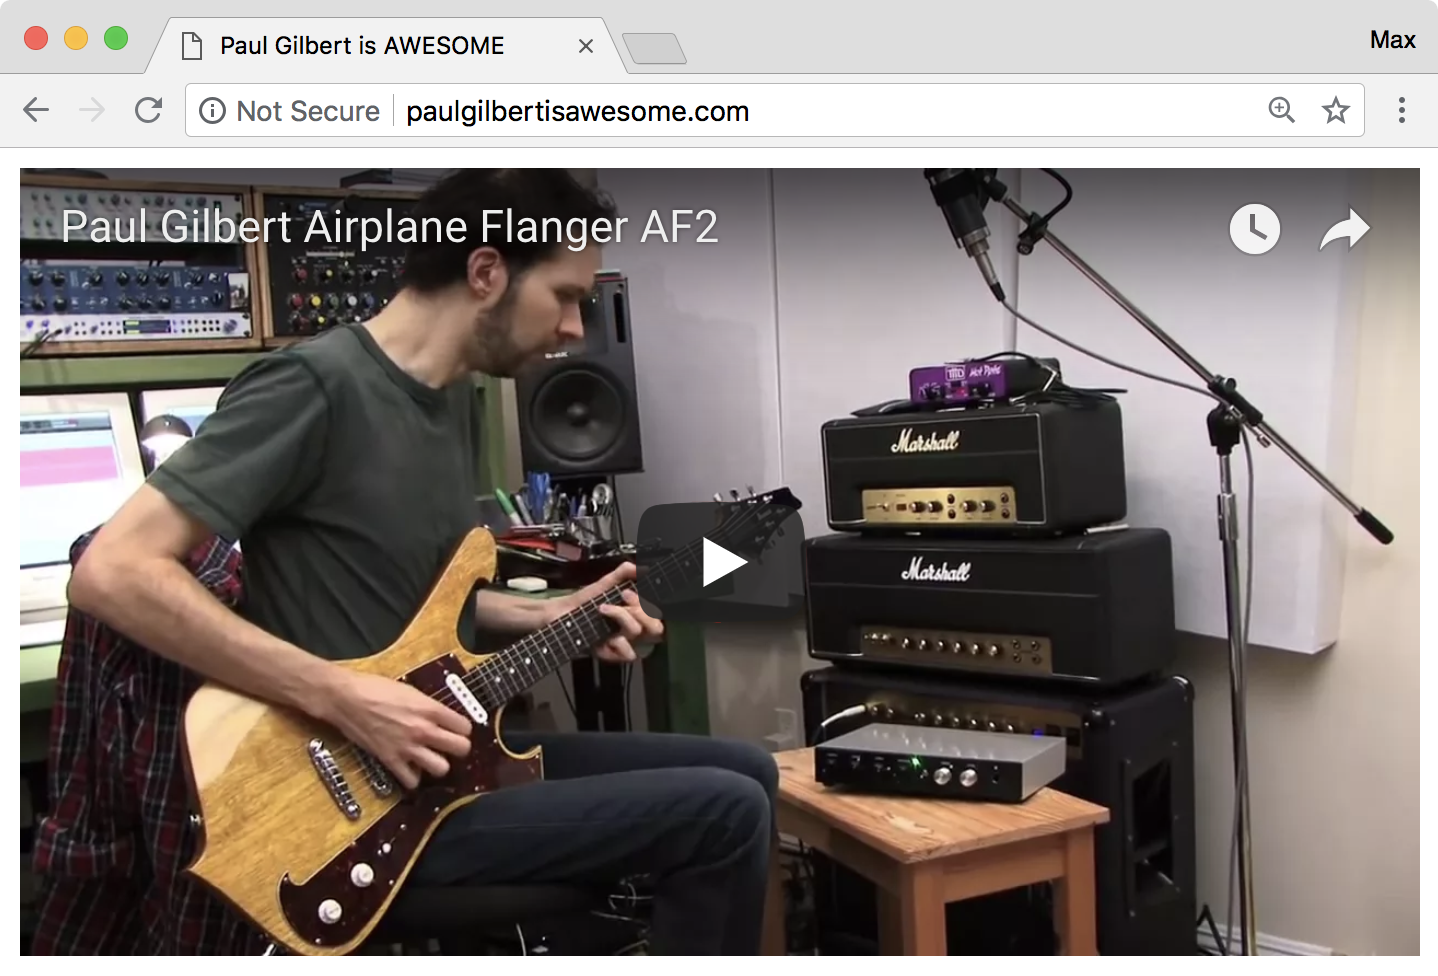
That looked good! However, if we go to paulgilbertisawesome.com, we will get a
403 Forbidden from NGINX. This is because with the buildpack we chose, NGINX
will attempt to serve the root of the repository (which doesn't contain an
index.html file - just a package.json, .static, dist/ and src/).
We need to tell Dokku that it should serve from the dist folder. Like this:
Terminal
$ ssh dokku-tutorial config:set paulgilbertisawesome.com NGINX_ROOT=dist
Dokku will give you quite a bit of output and essentially rebuild your app. Now if you go paulgilbertisawesome.com you will get to witness an awesome video:
Let's quickly summarize how we got a static app deployed to Dokku:
- Create the app (wow, really?)
- Make sure to have a
.envfile withBUILDPACK_URL=https://github.com/dokku/buildpack-nginx - Make sure to have an empty
.staticfile at the root of your project - Add
<dokku-hostname>:<dokku-app-name>as a git remote git push origin dokku master- Tell NGINX/Dokku which directory to serve:
ssh dokku-tutorial config:set <app-name> NGINX_ROOT=<site-dir>
Now if you want to update your site at a later point, it's as easy as making the changes, committing them and pushing them to Dokku.
5. Deploying a Simple Node App to Dokku
Hosting static sites with Dokku works well, but what about a real application?
Traditionally, hosting node apps hasn't always been the easiest thing. If you set up a VM yourself to do this, you have to find solutions to quite a few questions that will inevitably pop up:
- How do I restart my node process automatically if it crashes?
- How do I restart my node process if my server restarts?
- How do I deploy my app?
- As which user should my app run?
- How do I configure environment variables for my app?
- How do I deploy my app without any downtime?
- How do I periodically backup my database automatically?
Dokku has a solution to all these problems, and it's as easy as a git push.
What will we build?
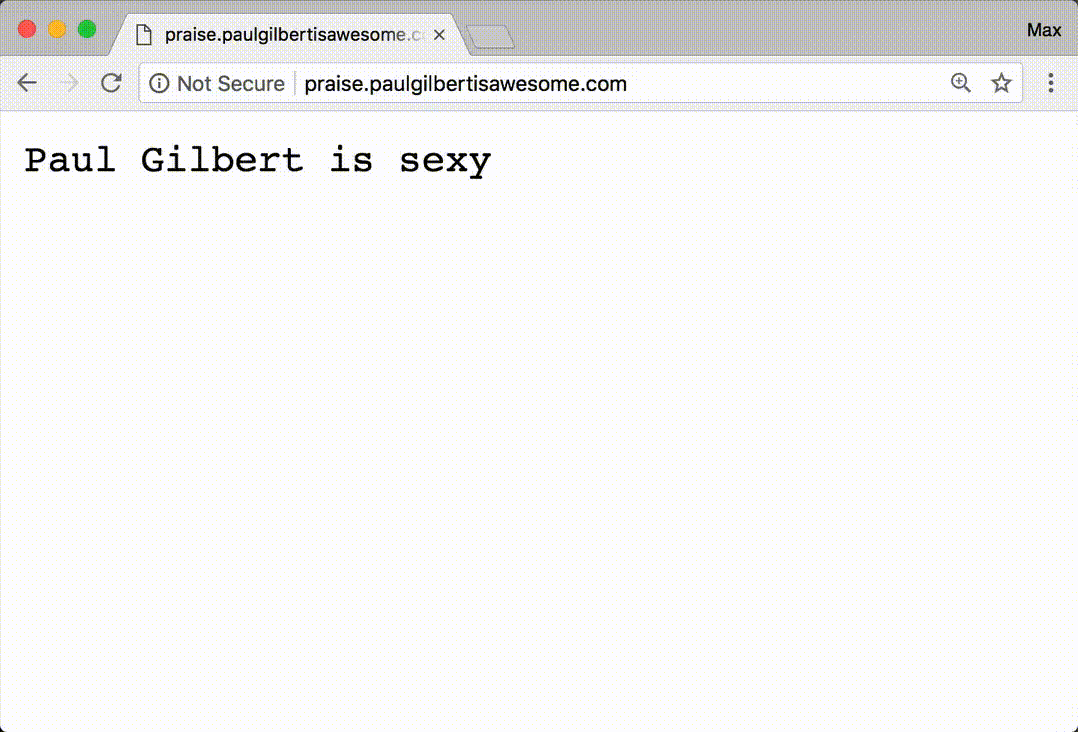
praise.paulgilbertisawesome.com - a node app that outputs a random praise for Paul Gilbert when accessed.
Let's start by creating a new folder and getting git setup:
Terminal
$ mkdir praise.paulgilbertisawesome.com$ cd praise.paulgilbertisawesome.com$ git init$ git remote add dokku dokku-tutorial:praise
Note how we are adding our remote. It's our Dokku's hostname (dokku-tutorial
followed by the name of the app (praise). Once our app is
deployed, it will be available at praise.paulgilbertisawesome.com.
The actual app code is very simple and consists of just a single file:
src/main.js
const http = require('http')const PORT = process.env.PORT || 3000const PRAISES = ['Paul Gilbert is awesome','Paul Gilbert is sexy','Paul Gilbert is amazing','Paul Gilbert is handsome','Paul Gilbert is godlike','Paul Gilbert is pretty','Paul Gilbert is cute','Paul Gilbert is funny','Paul Gilbert is kind','Paul Gilbert is gentle','Paul Gilbert is ROCK AND ROLL','Paul Gilbert is badass',]http.createServer(function (req, res) {if (req.url !== '/') {res.statusCode = 404res.end()return}const randomPraise = PRAISES[Math.floor(Math.random() * PRAISES.length)]res.end(randomPraise)}).listen(PORT, (err) => {if (err) {throw err}console.log(`server is listening on ${PORT}`)})
It's important to listen on a port provided by the PORT environment variable.
This is what Dokku uses to tell us which port to listen on. In the code above
we fallback to a default port (3000) for convenience during development.
The only other thing we need to do (besides listening on PORT) is to add a
start script to our package.json:
package.json
{"scripts": {"start": "node src/main.js"}}
Now, let's deploy this!
Terminal
$ git add .$ git commit -m "paul gilbert is in many ways awesome"$ git push dokku master
And that's it! The app is deployed:
That really was easier than deploying that static site, ey? No .static file.
No BUILDPACK_URL. No NGINX_ROOT. Nice!
6. Deploying a Simple PHP App to Dokku
OK, node apps are easy with Dokku. What about apps written in a different programming language? Like PHP?
Let's try it!
Terminal
$ mkdir php-praise.paulgilbertisawesome.com$ cd php-praise.paulgilbertisawesome.com$ git init$ git remote add dokku dokku-tutorial:php-praise
index.php
<?php$PRAISES = ['Paul Gilbert is awesome','Paul Gilbert is sexy','Paul Gilbert is amazing','Paul Gilbert is handsome','Paul Gilbert is godlike','Paul Gilbert is pretty','Paul Gilbert is cute','Paul Gilbert is funny','Paul Gilbert is kind','Paul Gilbert is gentle','Paul Gilbert is ROCK AND ROLL','Paul Gilbert is badass'];echo $PRAISES[rand(0, sizeof($PRAISES) - 1)];
(The ease of PHP is pretty awesome, you gotta admit!)
Terminal
$ git add .$ git commit -m "praising paul gilbert with php"$ git push dokku master
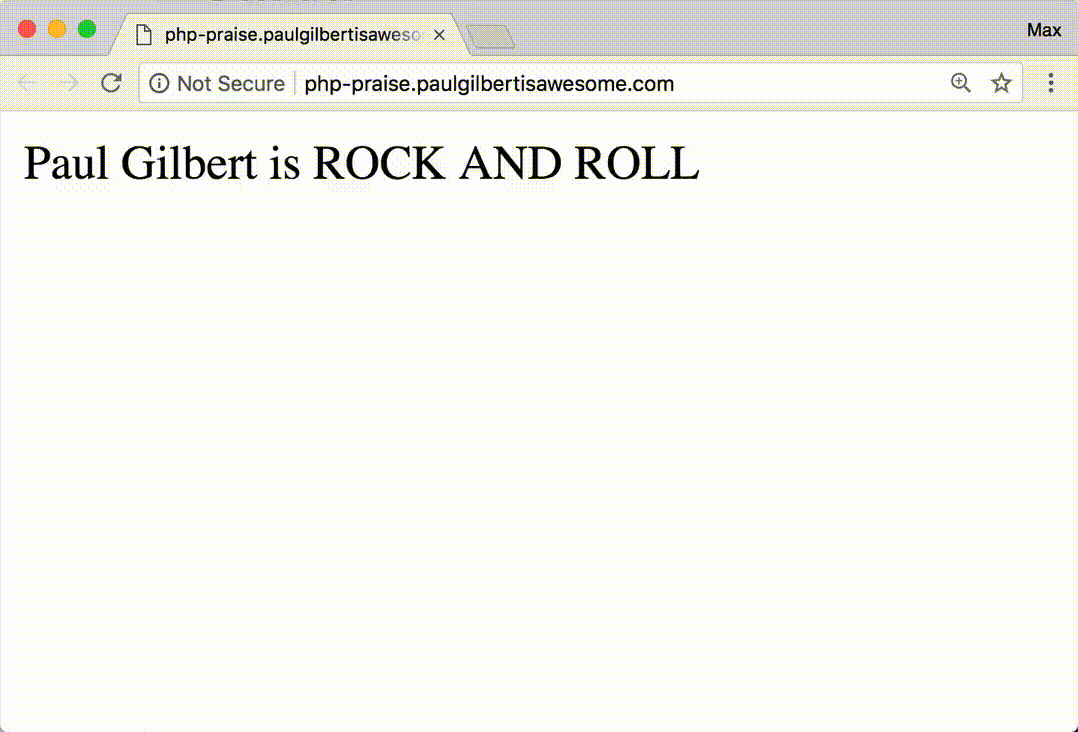
Man, that was easy!
Note
Notice how the font is a bit different than the node app? Weird, because we're just sending down text, right?
If you have a look at the dev tools, It looks like PHP sends a
Content-Type: text/html; charset=UTF-8 header while node does not do this by
default. That is why Chrome renders the output from our node app in a monospaced
font, while it's applying some default website styling to our PHP app.
It almost feels like Dokku is getting easier the more we use it! Now let's look at some more things you will want to know for most web apps. First: How can we deploy an app that uses a database?
7. Deploying a Node / MongoDB App to Dokku
Simple stateless apps are awesome but in most cases you will need some sort of database for your project. We will use MongoDB in this example to keep things simple but obviously Dokku supports many other databases as well.
If you want to run a database inside Dokku, you can always do a Google for
dokku <name-of-database> and you can be sure to find a plugin!
9.1. Installing the Official Dokku Mongo Plugin
You can find the official Dokku mongo plugin on GitHub at
dokku/dokku-mongo. Let's follow the
installation steps. Note that you have to be root to install plugins:
Terminal
$ ssh root@dokku-tutorialroot@dokku-tutorial:~# dokku plugin:install https://github.com/dokku/dokku-mongo.git mongo
Awesome how easy it is to install plugins. Creating the database and making it available to our app is just as easy.
9.2. Creating a MongoDB Database with Dokku
To create a database and expose it to our app, we need to create a so-called mongo service for our app. What should we call it? Well, what kind of app will we build?
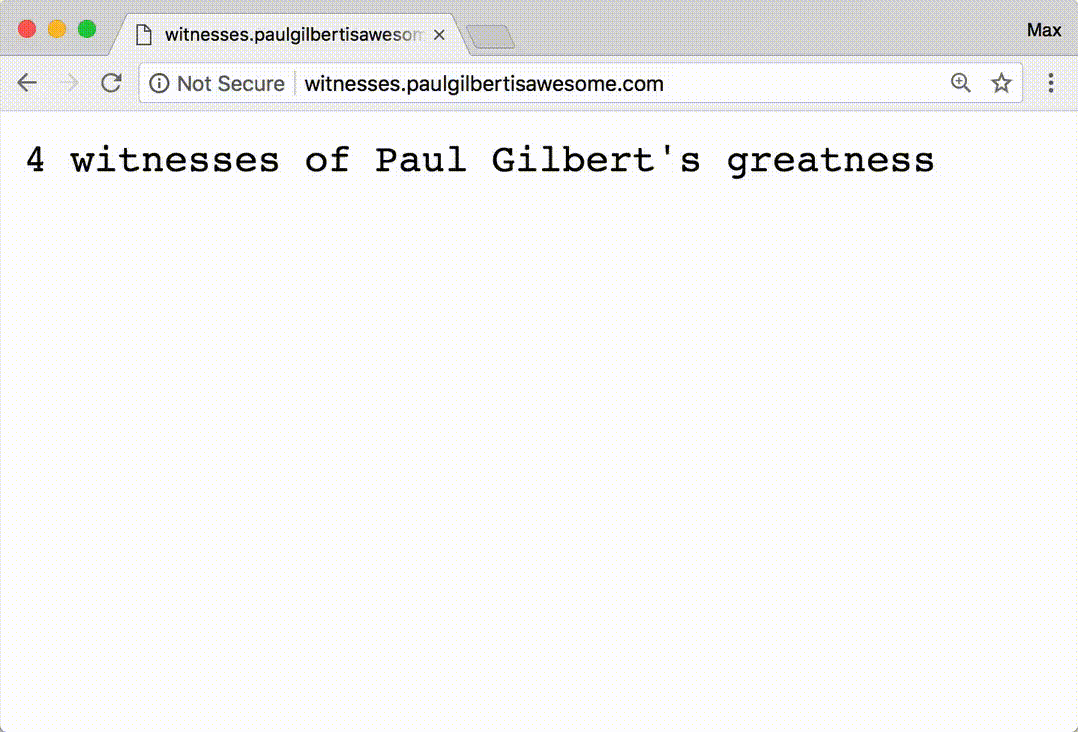
We will build witnesses.paulgilbertisawesome.com which counts the number of
people who have witnessed Paul Gilbert's awesomeness on our site. So let's
create a MongoDB service called witnesses:
Terminal
$ ssh dokku-tutorial mongo:create witnessesWaiting for container to be ready=====> MongoDB container created: witnesses=====> Container InformationConfig dir: /var/lib/dokku/services/mongo/witnesses/configData dir: /var/lib/dokku/services/mongo/witnesses/dataDsn: mongodb://witnesses:4ad9ceae708444c62403cde5323f6d63@dokku-mongo-witnesses:27017/witnessesExposed ports: -Id: 5aa687ce2a62e537f934e5e183bb1762f7fe4e94012b184216824fd61b3e60dfInternal ip: 172.17.0.5Links: -Service root: /var/lib/dokku/services/mongo/witnessesStatus: runningVersion: mongo:3.4.9
Done! Now let's create our witnesses app on Dokku directly (before writing any
code) and link our database to it. Linking our witnesses database to our
witnesses app will enable the witnesses app (and only that app) to connect
to the witnesses database.
But first, create the app:
Terminal
$ ssh dokku-tutorial apps:create witnesses-----> Creating witnesses... done
To link our database to the app, we can run mongo:link <mongo-service> <app>:
Terminal
$ ssh dokku-tutorial mongo:link witnesses witnesses-----> Setting config varsMONGO_URL: mongodb://witnesses:4ad9ceae708444c62403cde5323f6d63@dokku-mongo-witnesses:27017/witnesses-----> Restarting app witnesses! App witnesses has not been deployed
As you can see, by linking the database and the app, Dokku now exposes an
environment variable MONGO_URL to our app that we can use to connect to the
database. With all that setup, we can start coding:
9.3. Writing the App
We'll begin again by creating a new folder:
Terminal
$ mkdir witnesses.paulgilbertisawesome.com$ cd witnesses.paulgilbertisawesome.com$ git init$ git remote add dokku dokku-tutorial:witnesses
We'll also add a package to connect to MongoDB:
Terminal
$ yarn add mongodb
Now we're ready to code. When reading the code, make sure to take note that we
are now dependent on two environment variables: PORT and MONGO_URL:
src/main.js
const http = require('http')const { MongoClient } = require('mongodb')const PORT = process.env.PORT || 3000const MONGO_URL = process.env.MONGO_URL || 'mongodb://localhost:27017/witnesses'main()async function main() {const mongoClient = await MongoClient.connect(MONGO_URL, {useNewUrlParser: true,})const db = mongoClient.db()http.createServer(async function (req, res) {if (req.url !== '/') {res.statusCode = 404res.end()return}await db.collection('witnesses').insertOne({ witnessedAt: new Date() })const numWitnesses = await db.collection('witnesses').count({})res.end(`${numWitnesses} witnesses of Paul Gilbert's greatness`)}).listen(PORT, (err) => {if (err) {throw err}console.log(`server is listening on ${PORT}`)})}
What we have is a simple node app that connects to a mongo database declared in
the MONGO_URL environment variable and starts a web server on the declared
PORT. When accessing the site (at /) we insert a document into our database.
We then read the number of documents in the database and send them as a
response.
Before we can deploy this, we (because this is a node app) need a package.json
with a start script:
package.json
{"scripts": {"start": "node src/main.js"},"dependencies": {"mongodb": "^3.1.3"}}
And because this app has dependencies, we'll add a .gitignore to exclude
node_modules from our repository:
Terminal
$ echo node_modules > .gitignore
Now let's deploy!
9.4. Deploying the App
Terminal
$ git add .$ git commit -m 'initial commit'$ git push dokku master
I've never had such an easy time deploying a database-driven app as I have had with Dokku. That was it!
You know what's cool? Most database plugins for Dokku support automated scheduled backups to Amazon S3!
8. Adding SSL (HTTPS) to Your Dokku Apps and Sites
Nowadays your site MUST support HTTPS. A few years ago this was still a challenge for many developers. It cost money and was pretty complicated to set up. You also had to renew your certificates every year or so and when that time came, you had already forgotten how to do everything again. It was a real pain!
But thanks to Dokku and Let's Encrypt, adding HTTPS support to your site is now the easiest thing in the world.
We will add SSL support to all our sites. I lost count a little, so here is a quick list:
- paulgilbertisawesome.com
- php-praise.paulgilbertisawesome.com
- praise.paulgilbertisawesome.com
- witnesses.paulgilbertisawesome.com
Ok, first we need to install the Let's Encrypt plugin:
Terminal
$ ssh root@dokku-tutorial$ dokku plugin:install https://github.com/dokku/dokku-letsencrypt.git
To add HTTPS to any app, we simple run two commands:
dokku config:set --no-restart <app-name> DOKKU_LETSENCRYPT_EMAIL=<your-email>dokku letsencrypt <app-name>
Let's do it:
Terminal
$ ssh dokku-tutorial config:set --no-restart paulgilbertisawesome.com DOKKU_LETSENCRYPT_EMAIL=max@maxschmitt.me$ ssh dokku-tutorial letsencrypt paulgilbertisawesome.com$ ssh dokku-tutorial config:set --no-restart php-praise DOKKU_LETSENCRYPT_EMAIL=max@maxschmitt.me$ ssh dokku-tutorial letsencrypt php-praise$ ssh dokku-tutorial config:set --no-restart praise DOKKU_LETSENCRYPT_EMAIL=max@maxschmitt.me$ ssh dokku-tutorial letsencrypt praise$ ssh dokku-tutorial config:set --no-restart witnesses DOKKU_LETSENCRYPT_EMAIL=max@maxschmitt.me$ ssh dokku-tutorial letsencrypt witnesses
Done! :)
We'll add one more thing. Let's get Dokku to automatically renew our certificates for us:
Terminal
$ ssh dokku-tutorial letsencrypt:cron-job --add
That's it! Now enjoy your apps running on production with SSL. :)
9. The End
Wow, that was it. This was a pretty short article but I think we covered 99% of what you would want to do with Dokku. You learned how to set it up from scratch basically. We deployed a few apps together. We were able to use a database. We got SSL working.
One of the most awesome experiences I had with Dokku, was when I recently upgraded my installation that was over 3 years (!) old. I ran two commands and everything worked flawlessly. No hickups. No compatability issues. It just worked. That kind of an upgrade experience is pretty rare and says a lot about the quality of Dokku in my opinion.
Shout-out to the devs of Dokku for making such an awesome project. You can find out more about Dokku on their GitHub: dokku/dokku
I hope you were able to learn something from this little tutorial. If you get your project deployed, let me know! Send me a tweet to @Mackseraner – I would love to check it out!
Happy coding and deploying!